Staff Guide

Welcome to the DemocracyCraft Staff Guide! This guide contains all staffing policies, tips, and tricks that is used in day-to-day operations. By making this guide public access, our playerbase is informed of the expectations and procedures our Staff are subjected to.
If you are a new hire, first off - congratulations! We're excited to have you onboard with us. Seeing the table of contents/how long this document is may appear scary at first, but try to remember we don't expect you to memorise everything. We give you this guide so you know where to refer to when you need help, in addition to your peers.
With enough time, you might end up contributing to this guide!
Staff-wide Policies
These are policies every Staff member should be familiar with!
Career Progression and Disciplinary
The purpose of this guide is to provide information on how staff are selected and how staff members progress in their careers. This guide also provides guidance on staff-specific disciplinary actions.
Values
The Staff team operates on four core values
Service
The selflessness of character to place the interests of our server and its players ahead of your own (Activity, Ticket Counts, etc).
Integrity
The consistency of character to align your thoughts, words, and actions to do what is right (Honesty and Moral Strength).
Respect
The humanity of character to value others and treat them with dignity (Engagements).
Excellence
The willingness of character to strive each day to be the best you can be, both in a staff context and personally (Going above and beyond).
Progression
Staff progression is determined by a series of factors such as, but not limited to:
- Activity
- Character
- Competence
- Suitability for promotion
- Engagement with the Server and it's community
- Adherence to Staff Values and Expectations
What staff progression is not determined by
- Your political or business affiliations, spicy or not.
- Your friendship with other staff members. Your rapport, however, will be considered.
- Whether you simp for, or are politically aligned to, End or Tech.
Who determines your progression to these ranks
- All: Your mentor will advise in if and when you are promoted.
- Senior Administrator: Server Leadership
- Administrator: Senior Staff
- Moderator: Administration Team+
- Trial Moderator: Administration Team+
How does it work?
- A member of the team, generally a senior staff member, will raise a nomination for discussion.
- A discussion is had about the member's suitability and other defining factors.
- The nomination is put to vote. Generally no comments are provided by the poster of the vote in the vote channel itself in order to maintain neutrality.
- An outcome is reached over time or after further discussion.
Staff Disciplinary System
If a staff member has been punished under the staff disciplinary system (SDS), they will not be punished under the server rules for the same breach. The staff disciplinary system takes precedence.
Coaching
Coaching is an informal process which is not recorded. Coaching is provided to staff members who make minor mistakes by their staff mentor or other more senior staff members. The aim of coaching is to prevent the behaviour from happening again by discussing what went wrong and how it could be dealt with differently next time.
Warning
Warnings are a formal process which is recorded in the Staff member's channel. Warnings are provided to staff members who continue to repeat behaviours after coaching or who have made errors in judgement. All warnings are tied to a Staff Value(s).
Notice to Show Cause (NTSC)
A NTSC is a formal process which is recorded in the Staff member's channel. A NTSC is provided to staff members who have received an unreasonable amount of warnings, or for continued warnings based on the same behaviours. A NTSC may also be issued to staff who have made significant errors in judgement.
Duties and Expectations
Our Staff have several day-to-day roles that are covered under specific titles. Below is a table that comprises of typical duties and who is responsible for each duty.
As you progress up the ranks, you are expected to maintain your prior level's duties while taking on the added duties. A focus is given to being able to help the server with your extended privilages.
| Corporate Management | Systems Management | Mentor/Monitor Administrators | Mentor/Monitor Moderators | Staff Dispute Resolution | Player Dispute Resolution | Manage Forums | Manage Server | Staff Application Verdicts | Manage Permissions | Conduct Rollbacks | Discord Roles | Spawn Items | Regioning | Vaulting | Player Support/Tickets | |
|---|---|---|---|---|---|---|---|---|---|---|---|---|---|---|---|---|
| Server Leadership | ✅ | ✅ | ✅ | ✅ | ✅ | ✅ | ✅ | ✅ | ✅ | ✅ | ✅ | ✅ | ✅ | ✅ | ✅ | ✅ |
| Senior Staff | ✅ | ✅ | ✅ | ✅ | ✅ | ✅ | ✅ | ✅ | ✅ | ✅ | ✅ | ✅ | ✅ | ✅ | ||
| Administrators | ✅ | ✅ | ✅ | ✅ | ✅ | ✅ | ✅ | ✅ | ✅ | ✅ | ✅ | ✅ | ✅ | |||
| Moderators | ✅ | ✅ | ✅ | ✅ | ✅ |
Values
These are a set of principles that guide us as a team.
- Service - The selflessness of character to place the interests of our server and its players ahead of your own
- e.g. activity, ticket counts, etc.
- Integrity - The consistency of character to align your thoughts, words, and actions to do what is right
- This refers to being truthful, and your moral strength
- Respect - The humanity of character to value others and treat them with
- This refers to how you engage with others
- Excellence - The willingness of character to strive each day to be the best you can be, both in a staff context and personally
- This is what is often referred to as 'going above and beyond'!
Expectations
- As a staff member you have access to certain staff-related information. This should not be shared with anyone outside of the staff team. Respect player confidentiality.
- Be integral. Don't steal. Don't lie.
- We all make mistakes and we learn through them. Don't try and cover them up, it doesn't help anyone!
- If you aren't sure, ask your fellow staff members!
- Approach tickets in a timely, friendly, and helpful manner.
- Respect and value the advice of staff that are senior to you.
- Staff permissions are used for tickets while assisting other players only.
- Be positive! - Smile :)

For Senior Administrators
Console
As a Senior Administrator, you are able to access both the server console and files. To be added to the panel, direct message on Discord either owners to recieve your invitation! You will mainly be using this to configure plugins, fix bugs, and add new features.
There is no one set way of learning how to do these things. Trial and error, along with observation goes a great deal in helping you form your own way of doing these things.
Be sure to log any player-facing changes in #changelog, and any internal changes in #internal-changelog. This way we have an accurate record of who's done what!
For System Administrators
Resetting the Nether and End
In most instances, a Nether and End reset will occur once every 6 months, typically during our quiet hours. This time frame tends to be 10pm EST - 5am EST is the optimal time for this reset.
Steps
- Try to make an announcement in #server-announcements one week away for the desired data.
- Make a follow up announcement at least 48 hours before the reset as well to give players a reminder that this is about to happen!
- Turn on the whitelist via
/whitelist onto ensure those pesky players stay out of our way. - Delete both Reveille_nether and Reveille_the_end using
/mw delete <world>. - Recreate both Reveille_nether and Reveille_the_end using
/mw create <world>. - Using
/gamerule, setkeepInventorytotrue,announceAchievementfalse, andshowDeathMessagetofalse. - Merge inventories between the worlds by running
/mw inventory merge Reveille Reveille_nether Reveille_the_end Wilderness NewHamilton. - Have a staff member check that keeping inventory works, and that death messages don't show in the Nether and End respectively.
- Link nether portals correctly via
/world netherportal destination Reveille_nether Wildernessand/world netherportal destination Wilderness Reveille_nether. - Open the server back up by removing the whitelist. (
/whitelist off). - Announce the change in #changelog :)
Red v. Blue Event Guide for Staff
Purge old teams
- (Done through Console)
lp bulkupdate all delete "permission == group.blue"(Will require for the command to be confirmed) - (Done through Console)
lp bulkupdate all delete "permission == group.red"(Will require for the command to be confirmed)
Setting up Team Selection
- Identify where the team selection block will be. (Confirm with the DPA)
- Run
/mycmd-blockset create(looking at the target block) - Run
/mycmd-blockset add /redblue(looking at the target block)
Team Verification / Checks |
- You should be able to see the teams displayed on TAB
- Make sure that it is assisnging the teams at random through the GUI.
- Announce the change in #Changelog!
Post Event Checks
- Create and provide rewards to the DPA.
- Remove / Purge teams (Repeate 'Purge old teams' for reference)
For Administrators
How to manage Billboards
We use a plugin called ImageMaps to allow us to implement images in-game via item frames. This plugin is currently how we're able to make billboards!
Steps
- Upload your image to an image hosting service such as Imgur or ImgBB
- Download the image in-game by running
/imagemap download <filename> <sourceURL>
- Replace
<filename>with an easy to identify name, without any file extensions such as.png. - Replace
<sourceurl>with a link to the image, this should include the file extension such as.png.
- Place the image in-game by running
/imagemap place <filename> [frameInvisible] [frameFixed] [frameGlowing] [size]
- Replace
<filename>with the file name you selected in Step 2. Please add the file extension featured in the<sourceurl>you used earlier. - Replace
[frameInvisible]with "true", no quotation marks. This ensures that players do not see the default item frame texture in empty spaces of the image. - Replace
[frameFixed]with "true", no quotation marks. This ensures a clean removal of the image by punching the item frames in creative. - Replace
[frameGlowing]with "false", no quotation marks. This the frames are not glowing. - Replace
[size]the height (A) and width (A) in the following format: AxB- i.e. for a 2 by 2 image, it would be:
2x2
- i.e. for a 2 by 2 image, it would be:
- Admire your work!

Understanding your Forums Privilages
As an administrator you have access to our forums control panel. Here you can update user roles and profiles, as well as manage various forum functionality.
You can login to the control panel with the same credentials you use for the forums here
User Confidentiality
You will have access to more information than a regular player. This information is in confidence and as always, we have a zero tolerance approach to privacy breaches.
User Role Management
Never update a user's primary group. It should always be Registered.
When updating groups, all you should be modifying are Secondary Groups. Do not modify regular Department or otherwise automated roles.
 Staff changes require two separate roles and one option:
 Show as Staff, Staff, and Moderator/Administrator/Senior Administrator.

Broken Role Syncing
When a player's roles are not syncing properly, these are the three simple steps you do to fix this.
- Remove all their Secondary Group Roles (excluding Staff roles!)
- Ask them to log in, wait a few seconds and then log out
- Ask them to log back in after 2-3 seconds
If their roles don't sync back up - please ask them to log in for 2-3 minutes instead before logging out.
How to conduct Rollbacks
We use the industry standard plugin CoreProtect to log all of our in-game interactions. This allows us to rollback, inspect, and review any player changes or interactions as they happen.
Commands
/co help- help command; displays all commands./co rb; /co rollback- rollback block data based on certain parameters.- Usage:
/co rb u:<user> t:<time> r:<radius> a:<action> b:<blocks> e:<exclude>
- Usage:
/co undo- revert a rollback.
You can see a list of parameters for these commands here.
Additional Information
Here is a video tutorial that goes other aspects of CoreProtect that are not covered within this guide.
How to manage VPN Bypasses
Players will commonly open tickets suffering connection issues. There are multiple ways we can attempt to solve this, but before anything else get them to turn their router off and back on. This is often the simplest solution.
For Windows
Flushing DNS
- Navigate to the desktop.
- Right-click the Start button.
- Choose Command Prompt.
- When asked whether to allow Command Prompt to make changes to your computer, select Yes.
- Type
ipconfig /flushdnsand press Enter. You'll receive a message when your DNS has been cleared.
Flushing the cache removes all the information stored in the cache, forcing the computer to find new DNS information. This will not harm your computer.
Changing DNS
- Click on the Start menu, then click on Control Panel.
- Click on Network and Internet.
- Click on Change Adapter Settings.
- Right click on the Wi-Fi network you are connected to, then click Properties.
- Select Internet Protocol Version 4 (or Version 6 if desired).
- Click Properties.
- Write down any existing DNS server entries for future reference.
- Click
Use The Following DNS Server Addresses. - Replace those addresses with the
1.1.1.1DNS addresses: - For IPv4:
1.1.1.1and1.0.0.1 - For IPv6:
2606:4700:4700::1111and2606:4700:4700::1001 - Click OK, then Close.
- Restart your browser.
VPN
If all fails, this could be a routing issue that cannot be solved through conventional means. Asking the player to use a free Virtual Private Network (VPN) such as Cloudflare Warp.
If you offer this option, please provide the player with the antivpn.bypass permission node in-game.
Administrative Commands
These are useful commands to know with your position.
LuckPerms
/lp; /luckperms; /perm; /perms: /permissions- Main alias. Put these before any LuckPerms command./lp editor [type]- Opens a website interface to edit permissions data. After changes are saved, a command will be given that you need to run for the changes to take effect.[type]- the types to include in the editor session. can beall,usersorgroups.
User Commands
/lp user <user> info/lp user <user> permission/lp user <user> parent/lp user <user> meta/lp user <user> editor/lp user <user> promote <track> [context...]/lp user <user> demote <track> [context...]/lp user <user> showtracks/lp user <user> clear [context...]/lp user <user> clone <user>
Add in-game roles via /lp user <user> parent add <job>
Group Commands
/lp group <group> info/lp group <group> permission/lp group <group> parent/lp group <group> meta/lp group <group> editor/lp group <group> listmembers [page]/lp group <group> setweight <weight>/lp group <group> setdisplayname <name>/lp group <group> showtracks/lp group <group> clear [context...]/lp group <group> rename <new name>/lp group <group> clone <name of clone>
General
/tps- check the ticks-per-second (tps). The go to command to check for server lag./whois- useful for finding a players IP if you wish to ban their IP./socialspy- able to see players private messages.
Crates
/crates give <user> <crate>- sometimes it's easier to give these to yourself and then transfer them to the player's inventory. This is for a couple of reasons:- It won't work if the player's inventory is full.
- It requires the player to be online.
For Moderators
Here is everything a Moderator needs to know!
Managing Players
Players are tricky business but shouldn't be feared - after all you are one! Here are some guides on scenarios and managing behaviour.
How to check for Alternative Accounts
Players are only allowed one account on our discord, forums, and in-game. This is for a few reasons; mainly for ease of identification and punishment as well as for economic reasons in game.
Players who join and show as alternative accounts should be alternative accounts tested.
Players who have alternative accounts will receive all of the punishments associated on their main account. The alternative accounts should be banned.
Assessing
When someone first joins the server, our punishments plugin automatically runs a check on them (manually you can do /alts <username>). This scans their account to see if there are any other accounts that are playing on the same IP as them.

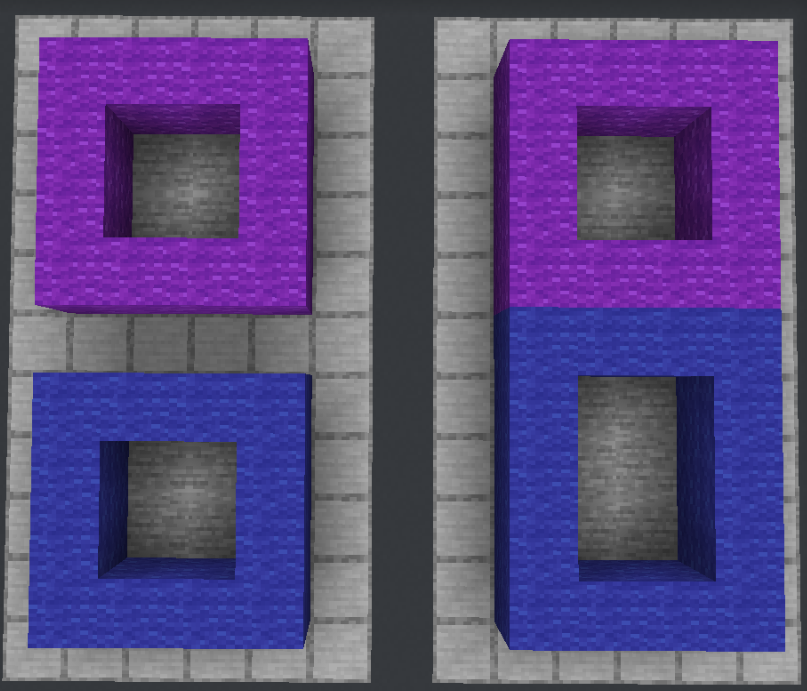
Once you do /alts, something like this will come up. If there are two or more green usernames (which means that they are both online at the same time), check #relations on discord to see if someone has already done an alternative accounts test on them. If no one has, then you need to conduct one.
If you run /alts on someone and they have one green username and one or more grey usernames, that means that an account with the same IP has logged on before. Check #relations to see if they have passed the alternative accounts test before. If they haven't, make a note in #relations.
You can also check both accounts' command histories by running /co lookup on them. If one account has transferred all of its money to the other account, it is pretty safe to say that they are alternative accounts.
Testing
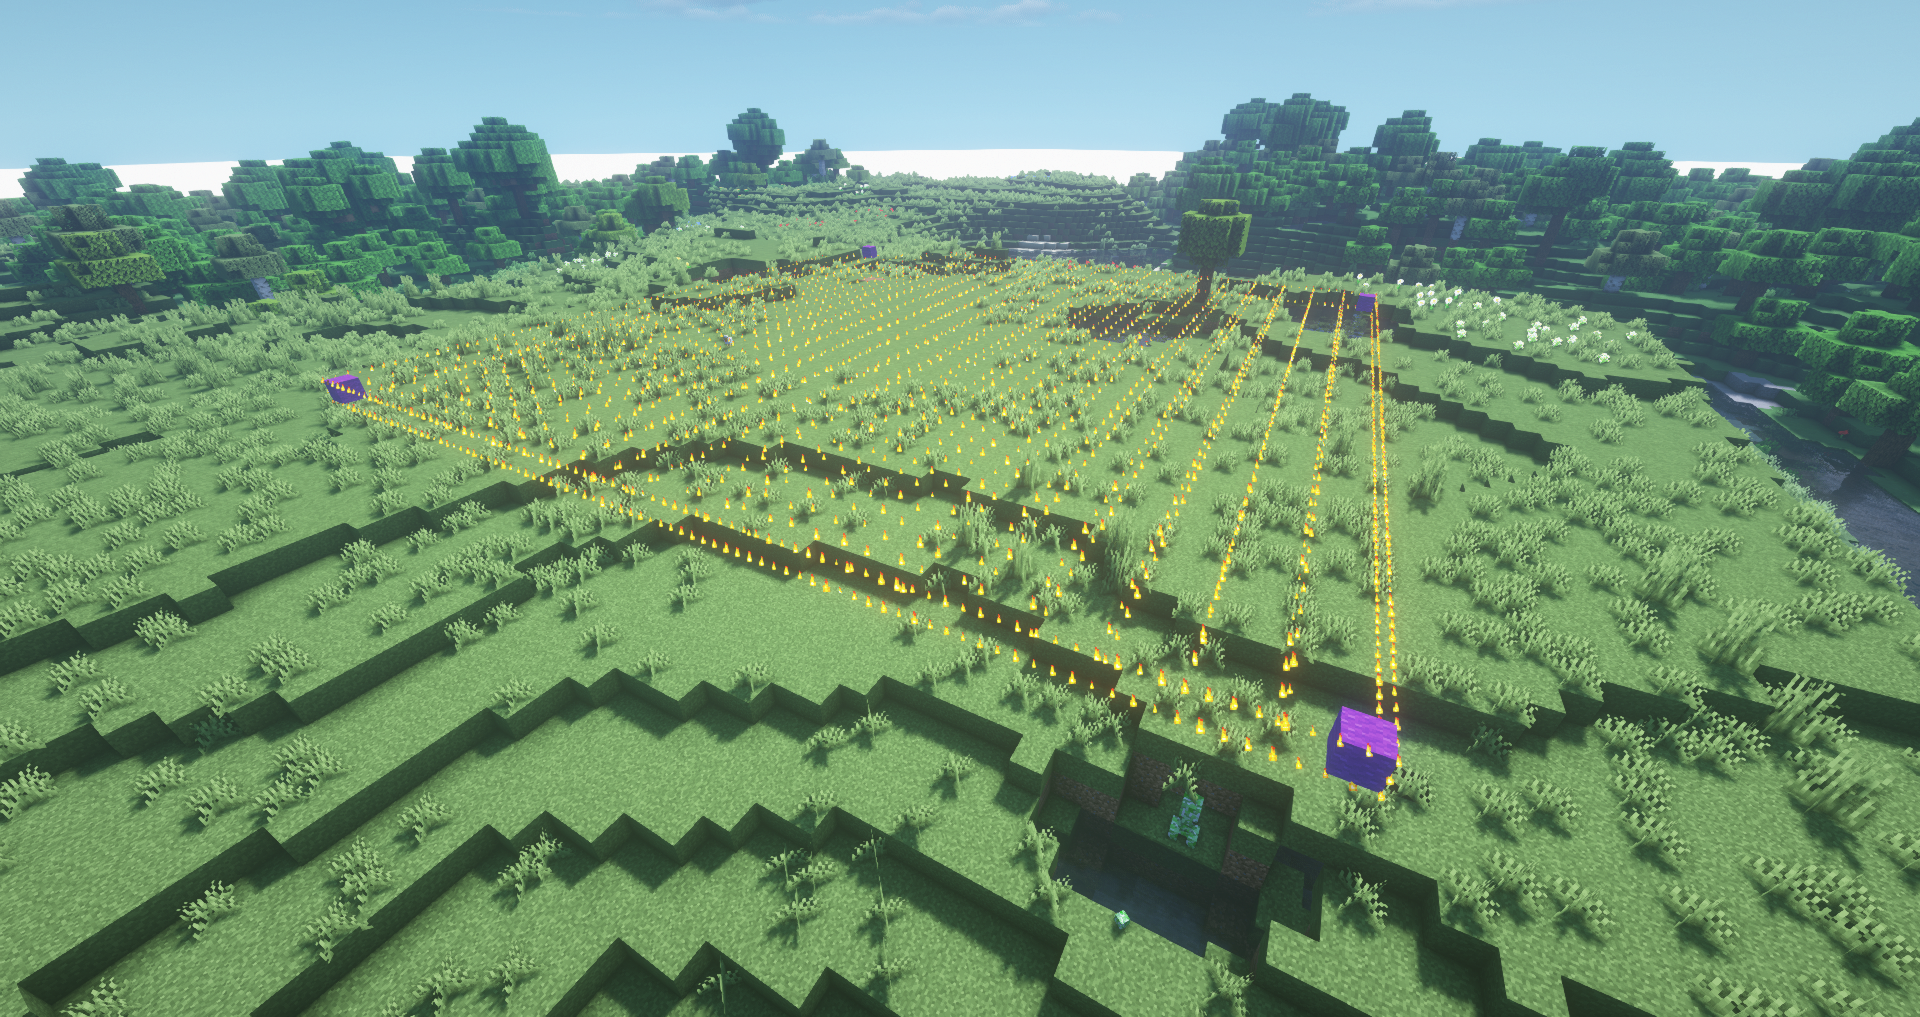
If both accounts are online you can first try conducting the movement test.
- You can warp yourself and them to the alts testing area using
/warp alts <player>. - Once both players are there, inform them that their accounts have been flagged as suspicious and that you need to conduct an alternative accounts test on them.
- Ask one player to run on the pink line and the other on the blue line.
- You then look to verify that both accounts are making independent movements from one another (they are both moving at the same time).
If they fail the test in one of these listed ways, you’re allowed to ban one of the accounts permanently for having alt accounts;
- One of the players is not moving or moving every so often
- Only one player moves at a time
- One is uncooperative with the test (not responding to anything)
- One or both accounts log off and do not return after a while.
However, if the players pass, you can run /staff-notanalt <username 1> <username 2> and it will remove the warning and add a message in #notes.
Additionally, you could go into /spectator and /staff-tp to them to further investigate/watch their movements to verify that they aren't alts.
Understanding Basics
WorldGuard
/rg define <name>- Creates a region./rg remove <region>- Removes the specified region./rg redefine <name>- Re-sets an existing region to your current selection./rg setparent <region> <parent>- Sets the specified region to be a child of the second given region. Used for when creating apartment regions.- Ex.:
/rg setparent ExampleRegion dc-001- Sets dc-001 as the parent of region ExampleRegion
- Ex.:
Flags
Here is a basic rundown of some flags you might come across or may need to add/change.
| Flag | Type | Description |
|---|---|---|
| interact | state | Everything that involves ‘using’ a block or entity: Whether doors, levers, etc. can be used, whether vehicles (including animals) can be mounted. |
| block-break | state | Whether blocks can be mined |
| block-place | state | Whether blocks can be placed |
| use | state | Whether doors, levers, etc. (but not inventories) can be used |
| damage-animals | state | Whether players can harm friendly animals (cows, sheep, etc) |
| chest-access | state | Whether inventories can be accessed |
| ride | state | Whether vehicles (including animals) can be mounted |
| pvp | state | Whether player versus player combat is permitted |
| sleep | state | Whether sleeping in a bed is permitted |
| respawn-anchors | state | Whether respawn anchors can be activated |
| tnt | state | Whether TNT detonation or damage is permitted |
| vehicle-place | state | Whether vehicles (boats, minecarts) can be placed |
| vehicle-destroy | state | Whether vehicles can be destroyed |
| lighter | state | Whether flint and steel can be used |
| block-trampling | state | Whether farmland and turtle eggs can be trampled |
| frosted-ice-form | state | Whether players with frost walker boots will form ice |
| item-frame-rotation | state | Whether items can be rotated within item frames |
| firework-damage | state | Whether fireworks can deal damage to entities |
For more information, please check out WorldGuard's Documentation.
WorldEdit
We use WorldEdit as a tool for many staff duties and staff duties only. Seen staff members rolling around with a wooden axe? Yep, that's a WorldEdit wand.
We use WorldEdit to make selections for regioning, vaulting, and assisting players in most instances, Abuse of this plugin is strictly not tolerated. You can find a practical course on the Staff Training warp to help with this guide.
It may seem like a lot to learn at first, however it's quite straight forward after a bit of time and experience.
Getting Started
Making a selection
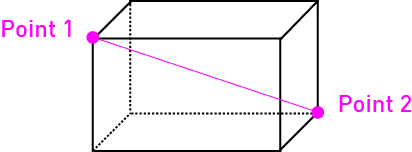
A cuboid is like 3D rectangle. In WorldEdit, you select the region that you want by setting two points of a cuboid. In the next example, the first point is the top right corner of the cuboid and the second point is the bottom left corner of the cuboid.
How do you choose the two points? You can...
- Left and right click blocks while holding a wooden axe (use
//wandto get a wooden axe) - Stand somewhere and enter
//pos1and//pos2 - Look at a block and enter
//hpos1and//hpos2
Commands
//wand- gives you a World Edit tool.Left click a block while holding it to make your first selectionRight click a block while holding it to make your second selection//wandoff- takes away a World Edit tool from your inventory.//cut- copies and clears your current selection.//paste- pastes your previous cut selection.//expand <amount> [direction]- makes your current selection expand by the amount specified in the specified direction.- Amount is either specfified as a number or
vert(infinitely vertical).
- Amount is either specfified as a number or
//calc- short for 'calculate'. Allows you to do equations in-game. Example://calc 100*7//sel [poly/cuboid]- select the type of region.Cuboidis the default selection type; basic two point selection- Left click a block to set first selection
- Right click a block to set a second selection.
- Poly is the advanced selection type.
- Left click a block to set first selection
- Right click a block to set a second, third, fourth, etc. selection
//sel- when used like this this command will clear your current selection.//rotate <degrees>- rotates your current clipboard (cut/copy) the specified degrees.- Degrees have to be in multiples of 90 or it won't work.
- i.e.
90,180,270,360,-90,-180,-270,-360.
//move <amount of blocks> [direction]- moves your current selection by the amount specified in the specified direction./expand <number> [direction]- modifies your selection in the direction specified by the amount of blocks specific.
Directions can be...
- Relative to the world
- i.e.
up,down,north,east,south,west.
- i.e.
- Relative to the player
- i.e.
forward,back,left, andright.
- i.e.
If a direction is ommited from the command, the region will expand in the direction the player is looking.
Examples:
//expand 6- Expand 6 blocks in the direction you're facing//expand 10 up- Expand 10 blocks upwards//expand vert- Expand the region selection from bedrock to the sky. Do not use when making rentable regions (i.e. apartment rooms)
The full documentation can be found at World 7.2 documentation
AreaShop
AreaShop is essentially a real estate plugin for world guard regions, allowing us to sell and rent them. You’re now able to sell and unrent regions owned by other players - This is used for when evicting players from a region.
This is a general guide - moderators should refer to the more specific guides on regioning.
Learn more about Apartments/Shops regioning
Learn more about Wilderness regioning
Commands
/as add <buy/sell> <region>- makes a region either a buyable or rentable region.- Used when making wilderness or apartment/shop regions.
You must specify the shop/apartment's region name when maing it rentable, otherwise you run the risk of making the parent plot rentable instead!
/as del <region>- deletes the specified region from AreaShop./as setprice <price> <region>- used to set the selling/renting price of an AreaShop region./as setlandlord <name> <region>- used to set the landlord of an Areashop region.- Wilderness regions will always have the landlord be
“DCGovernment - Apartment and/or shop regions, will have the owner of the parent region be the landlord unless told otherwise.
- Wilderness regions will always have the landlord be
/as setowner <player> <region>- used for when transferring ownership of a region to another player./as addsign <region>- used to add an Areashop sign to the sign you’re looking at./as delsign- used to delete the Areashop sign you’re looking at./as tp <region>- Teleports you to the specified Area Shop region.- Sometimes this command can teleport you to an underground cave, If this happens, just use /top to get above ground.
- Don't use this for personal transportation to your regions.
/as info player <player>- lists all of the regions the specified player owns or is added to. Sometimes doesn’t work.- An alias of this command is
/as me <player>.
- An alias of this command is
/staff-getsign- gives you a sign which you can use to make AreaShop signs.- Can also be used to label chests/buildings when vaulting.
/staff-getwool- gives you wool which you can use for selection points.
How-tos
Managing disputes
As a staff member you will sometimes be required to handle delicate situations. We run on a few principles to assist staff making decisions in these scenarios.
Solve problems as early as possible at the lowest level
Unfortunately arguments and disputes are not like wine and don't get better over time. They get worse.
It's really important for all parties that we jump on any situation early and solve the problem pacifically.
Steer clear of drama
Some players have a tendency to incite drama and you will come to learn who they are quite quickly. Be compassionate but keep a mind on players' motives.
Usually, what happens out of the server and its' server related channels isn't for us to deal with unless it's quite serious and relates to our platforms. i.e. bullying enabled by our Discord server.
Evidence
Sometimes players can get a little invested or tell white lies (i.e. not telling you the whole story where they may have also been at fault) when presenting to you with a report.
Make sure you collect evidence to support claims, regardless of the amount of people wanting a player banned for example.
There are two sides to every story
There will always be a personal bias in every story. Person A's story will always be slightly different from Person B's story.
It's important that you assess both sides to come up with an educated guestimate of the truth which is usually somewhere between the two stories.
Searching for Items
We use Coreprotect to log all of block interactions. This allows us to lookup certain interactions.
Commands
/co l; /co lookup- used to lookup specific block data./co l u:<user> t:<time> r:<radius> a:<action> b:<blocks> e:<exclude>
Parameters
These can be used in almost every CoreProtect command.
u:<user>
- Specify a user to rollback. Example: u:Technofied
t:<time>
Specify the amount of time to rollback. You can specify weeks, days, hours, minutes and seconds.
Example: t:2w,5d,7h,2m,10s
You can pick and choose time amounts. Example: t:5d2h
You can also use decimals Example: t:2.50h (2 and a half hours)
r:<radius>
Specify a radius. You can use this to only rollback blocks near you.
You can specify a number (i.e. r:5), a world (i.e. r:#world_the_end), a global rollback (r:#global), or a WorldEdit selection (r:#worldedit or r:#we)
For example, the following would only rollback damage within 10 blocks of where you are standing: r:10
a:<action>
Restrict the rollback to a certain action.
Example: If you wanted to only rollback blocks placed, you would use a:+block.
Here's a list of all the actions:
a:block- blocks placed/brokena:+block- blocks placeda:-block- blocks brokena:chat- messages sent in chata:click- player interactionsa:command- commands useda:container- items taken from or put in chestsa:+container- items put in chestsa:-container- items taken from chestsa:inventory- items dropped or picked up by playersa:+inventory- items picked up by playersa:-inventory- items dropped by playersa:item- items dropped, picked up, taken from, or put in chestsa:+item- items picked up or put in chestsa:-item- items dropped or taken from chestsa:kill- mobs/animals killeda:session- player logins/logoutsa:+session- player loginsa:-session- player logoutsa:sign- messages written on signsa:username- username changes
b:<blocks>
Restrict the rollback to certain block types. For example, if you wanted to only rollback stone, you would use b:1 You can specify multiple items, such as b:1,5,7
e:<exclude> - Exclude certain block types from the rollback.
Example: If you don't want TNT to come back during a rollback, you would type e:46
#<hashtag> - Add a hashtag to the end of your command to perform additional actions.
Example: To perform a rollback preview, you would use #preview
Here's a list of available hashtags:
#preview- preview a rollback/restore#verbose- display additional information during a rollback/restore#silent- display minimal information during a rollback/restore
Merging regions
Players may merge certain regions to allow for larger plots, provided that they own two or more neighbouring regions.
A common Sistake in staffing is regions being deleted during merges.
To merge a plot correctly, no regions should be deleted, both to save us time when unmerging and to preserve the plot numbering system.
To achieve this the following command ought to be used /rg redefine <plot>
Merging
To merge a region is quite simple - all that is required is to redefine a region over the plot divider. See below for an example.
What can be merged?
You can merge any commercial and industrial plots.
Residential, CBD, and any other special plots are NOT to be merged.
Urban Regioning
Urban regions are city/town plots and their child regions (apartments/shops).
This guide will show you how to create child regions. For this, you will be using World Edit (selecting the region), World Guard (making the region), and Areashop (renting the region).
- Child regions may only be created on Commercial and Industrial plots, not residential and are rent only. You cannot have rent regions within rent regions.
Step by Step Guide
-
1.1 Creating the WorldGuard region and fining the player.
- After selecting the points for the region you can define the region to create it.
- The owner of the building may choose the name of the region.
- Command:
/rg define <regionName>.- i.e.
/rg define EndStore1.
- i.e.
-
1.2 Make sure to fine the player for the creation of each region.
- Each region costs $25 to create excluding shulker regions, those are free.
- Command:
/fine <user> <amount>.- Select "Staff" as the account to send the fine to.
- i.e.
/fine xEndeavour 25.
-
2.0 Setting the region parent.
- Next we need to tell WorldGuard who the child region belongs to. In order to do this, we will parent the child region to the plot it's on.
- The parent is the plot the room will inherit permissions from.
- Setting the room’s parent will allow the plot owner and any other members of the plot to modify within the rooms.
- Command:
/rg parent <regionName> <PlotRegion>.- i.e.
/rg parent EndStore1 c001.
- i.e.
-
3.0 Adding the region to AreaShop
-
After you have created the WorldGuard region and parented it, it’s now time to make it rentable. All you need to do is add the region to Areashop.
- Command:
/as add rent <regionName>.
- Command:
-
3.1 Set the landlord
- Command:
/as setlandlord <landlord> <regionName>, this usually is the player who is creating the region.
- Command:
-
3.2 Set the price
- Command:
/as setprice <price> <regionName>
- Command:
-
3.3 Set the duration
- Command:
/as setduration <duration> <region>
- Command:
-
4.0 Adding an AreaShop sign
- If the player is unable to provide a sign for you to place and create, you can obtain one by using
/staff-getsign. - After you get a sign, you can place it somewhere outside of the door/front of the region where any player can access.
- The player will usually show you where they want the signs.
- After the sign is placed look at it and use the command:
/as setsign <regionName>, this will make the sign interactive and add the region's information to it.
- If the player is unable to provide a sign for you to place and create, you can obtain one by using
-
5.0 Quality Checks
Check the priority of the region is 30 or above via /rg info <regionName> - if not click on the priority and type in 30.
Make sure to get rid of the wool that you placed, don’t leave anything behind.
Using the sign-based method
If you prefer doing region creation through signs, try this!
Wild Regioning
Wilderness regions are private wild plots that any players can obtain.
It costs $10/block to claim land in the wilderness.
- Players may only have one wild region up to 4096 blocks in their wild region, and unless given permission, your region needs to be at least 20 blocks away from another player’s region.
Step By Step Guide
- 1.0 Getting the price for the region
- To get the price, you’re going to use your wand to select two corners but make sure they are on the same height (y level).
- This will give you the total number of blocks within your selection
- After this, multiply the total block number by 10 to get the price.
- Command:
//calc <totalblocks>*10
-
2.0 Seeing if the player can afford it
- After getting the total price of the land, check the player’s balance to see if they can afford it.
- Command:
/bal <player> - If they have enough money, tell them the price and ask if it’s okay.
- If they don't have enough money, let them know, maybe they'll have money in their companies. Otherwise, offer to resize the selection.
-
3.0 Creating the WorldGuard region
- Now that we have the region selected and we know the player can afford it, it's time to define the region.
- Command:
/rg define <playerName>- i.e.
/rg define Technofied
- i.e.
All wild regions should have the same naming convention: <playerName>
- 4.0 Adding the region to AreaShop
-
After you’ve created the WorldGuard region, it’s now time to make it buyable.
-
4.1 Add the region
-
Command:
/as add buy <regionName> -
4.2 Set the landlord
-
Command:
/as setlandlord DCGovernment <region>. -
4.3 Set the price
-
Command:
/as setprice <price> <region>
-
Let the player know to not buy the region until you tell them to! A lot of people sometimes buy regions too soon, and if that happens you would need to correct how much they've paid.
Expanding a region
Lets say a player already has a wild region, but would like to expand it.
-
1.0 Getting the price for the new region
- Select two corners of the new area the player would like their region to be expanded to.
- Note the number of blocks, and multiply it by 10 to get the total cost of the expansion and subtract it by the old region’s price.
-
2.0 Check if the player can afford it
- Command:
/bal <player>- ask if the player is okay with the price.
- Command:
-
3.0 Fine the player the cost (after the subtraction)
- Command:
/fine <player> <amount>- this will open a menu up and the option ofStaffshould be selected.
- Command:
-
4.0 Re-define the region to include BOTH their initial region AND their expanded area
- Select the old region via
/rg select <region> - Expand it into the new region with WorldEdit.
- Redefine region into the new size via
/rg redefine <region>.
- Select the old region via
For Everyone
Note taking
In order to keep comprehensive notes on our players that are easily accessible, we use the discord channel #relations.
Search for the player's full username, before creating a thread. In these threads we record evidence and general notes about players behaviours and punishments.
How and when to action warrants
Warrants are a legal writ that allow for only enforcement agencies to break the law under certain circumstances. I.e. trespass, take items, gather evidence. This is a function that requires Staff Support.
If you are involved in a case/investigation or have a vested interested in the outcome of a case/investigation, you are asked to recuse yourself from getting the information for the warrant.
Eligibility
A warrant is only enforceable if it is has been approved by a Judge or Justice. Agencies seeking to exercise warrants will need to provide proof that the warrant was approved appropriately.
Warrants generally need to be served within a 48 hour window before they expire.
- Noting that Staff tickets take more than 48 hours to process these requests, as long as the warrant was posted in a staff ticket prior to the warrant expiring, we can still provide the information post-deadline.
We can search through logs, but excessive requests (i.e. searching multiple days will be denied).
- No more than 48 hours and some topics/key words that we can search for within that timeframe is generally seen as acceptable.
- Beyond this it is up to the staff member taking the ticket.
Protecting Staff Information
Staff do not have to comply with legal orders - there are no punishments for not providing the information. If something seems off about the request, please raise it with your colleagues or senior staff. It is best to take a more cautious approach rather than accidentally giving away information that shouldn't be given away.
Warrants need to dictate what information they are seeking. We will usually search for this information and give that information to them only.
Who can request what
Animal and Villager Death Logs do not require warrants provided they are being requested by a member of the Department of Justice that is a Sergeant or above. Everything else requires a warrant!
Everything Senior Vice Presidents (SVPs)
Senior Vice Presidents or SVPs started as joke roles mocking mimicking corporate hierarchies. SVP roles now serve a function within the staff team and as development roles for staff members.
Elections
Like the truly democratic server that we are, the outgoing SVP morale will conduct SVP elections every 2 months. How do these elections work? Its up to the SVP morale. SVP elections are not democratic, they are fun.
You can't have the same role back-to-back!
SVP Election Months
- February
- April
- June
- August
- October
- December
SVP Morale
As SVP Morale you are the Chief Happiness Officer of the team. The Monarch of the SVPs - you are the ringleader. Your mission: Organise. Epic. Staff. Events. Bring your event planning skills, meme expertise, and ability to juggle jokes and logistics together.
Responsibilities
- Organise Staff events
- Help others organise Staff events
- Organise Staff competitions

SVP Links
As the SVP Links, you hold the prestigious title of the Discord's Master Linker. Your mission: to manage the #links channel, the gateway to wider DC platforms. Bring your expertise in hyperlinking and attention to detail to keep the channel organised.
Responsibilities:
Keep the #links channel up-to-date

SVP TALENT (Administrators+)
As SVP Talent, you hold the vital role of the Staff Whisperer. Your mission: to attract suitable candidates and ensure a smooth application process. Bring your keen eye for character and the ability to navigate the intricate world of staff recruitment.
Responsibilities
- Seek out and encourage potential staff members to apply
Monitor staff applications, ensuring they are promptly reviewed and presented for a fair and timely voting process.
- Can be posted by anyone, you just make sure its happening.
- Sends verdict in game via staff command.

SVP Justice (Administrators+)
As SVP Justice, you are the Judge, Jury, and Executioner. Your mission: to ensure that punishment appeals are reviewed promptly and fairly. You can also make summary decisions on frivolous appeals without putting them to the admin team for voting.
Responsibilities:
- Oversee the appeals process, ensuring that punishment appeals are acknowledged and handled in a timely manner Facilitate discussions among staff members involved in the appeal, encouraging constructive dialogue and diverse perspectives
- Summarily decide the verdict of minor appeals which don't need to go before the admin team (i.e. frivolous appeals, cake-less appeals, poem-less appeals, appeals that just should be accepted on the spot).
- Sends verdict in game via staff command.
SVP Retention
As SVP Retention, you are the mediator between Staff and the people. Your job is to collect information on what players want the most out of the server and then come up with ideas on how to implement it.
Responsibilities
- Gather information on most wanted features. Come up with your own ideas that would help with player retention
- Implement those ideas either with Staff help or Department of Education (depending on the feature)
- Most new features require both Staff and DOE engagement, so you will be the person who encourages and helps both teams.

SVP Evictions
As SVP Evictions, you are the Chief Displacement Officer. Your mission? Manage kicking people out of their homes with your worldedit wand and cold heart.
Responsibilities
- Oversee the evictions process, ensuring that evictions are handled in a timely manner.
- Delegate eviction tasks to staff members if we start to fall behind (you can delegate to all staff).
- Keep open lines of communication with the DCT as the staff representative for evictions.

Commands
Here are a list of commands that all Staff members have access to. Remember that they are only for Staff duties, and nothing is for personal benefit!
Vanish
You’re able to become invisible to all non-staff players, and seen as in spectator mode on tab to other staff as a physical floating head.
- This can be used in multiple situations:
- Watching for suspicious illegal activity
- Getting away from players if feeling overwhelmed
- Commands:
/vanish; /v- Silently puts you into vanish mode
- Other staff still get a broadcast of you entering vanish mode.
Inventory
You can open players' inventory in real time.
- Used to take items out of a player’s inventory if they’re not supposed to have it.
- Commands:
/openinv <player>; /oi - Accidental dropped items
- Stolen items
- Commands:
Ender Chests
Opens the specified player’s enderchest in real time.
- Commands:
/openender <player>; /oe
Teleportation
Teleports the specified player to spawn.
- Used if a player seems to be stuck from glitching.
- Commands:
/warps spawn <player>
Teleport to the specified player.
- Additionally you can teleport the player to another player
- i.e. /tp xEndeavour Technofied
- Teleports xEndeavour to Technofied
- Commands:
/tp2p <player> [player]
Teleports the specified player to your location
- Commands:
/tphere <player>
Returns you to your previous location.
- Elevators count as a previous location if used
- Used after closing a ticket or doing a staff duty.
- Commands:
/back
Teleports you to the highest block above your head.
- Used for when teleported underground from /as tp
- Commands:
/top
Teleports you to the specified coordinates
- i.e. /tppos 190 65 -100
- Commands:
/tppos <coords>
Other
Puts you into or out of spectator mode.
- Used to bait x-ray users, searching for chests when vaulting, and when vaulting a building that has a basement.
- Commands: /spectator
Turns fly mode on or off.
- Commands:
/fly <reason>
Teleports you to the top of an area if under something.
- Commands:
/top
Sets your in-game drunkenness to 0%.
- Commands:
/staff-sober
Resets a player's in game nickname/display name
- Use this to correct incorrect usernames or inappropriate nicknames.
- Commands:
/nickname player <player> reset
Use this to remove any ghost locks.
- Must be run after vaulting and can be used when players complain about Air etc being locked.
- Commands:
/staff-cleanup-locks