More actions
Created page with "<span id="security-cameras"></span> Do you need to keep an eye on your valuables or watch out for unwelcome visitors? These simple steps will help you get started! <div class="figure"> image </div> <span id="crafting-the-cameras-and-computers"></span> == Crafting the Cameras and Computers == To begin, follow the recipe below to craft both a camera. <div class="figure"> image </div>..." |
Goldendude15 (talk | contribs) m Specified how plugin isn;t enabled |
||
| (4 intermediate revisions by one other user not shown) | |||
| Line 1: | Line 1: | ||
<span id="security-cameras"></span> | <span id="security-cameras"></span> | ||
Do you need to keep an eye on your valuables or watch out for unwelcome visitors? These simple steps will help you get started! | Do you need to keep an eye on your valuables or watch out for unwelcome visitors? These simple steps will help you get started! '''NOTE: This plugin is currently NOT enabled hence recipes will not work''' | ||
<div class="figure"> | <div class="figure"> | ||
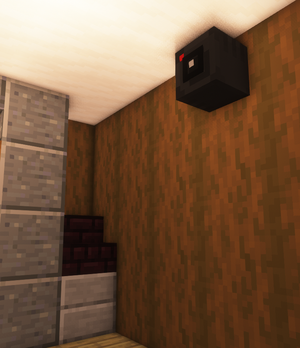
[[File: | [[File:security_camera.png|thumb|A security camera mounted to the wall]] | ||
</div> | </div> | ||
| Line 11: | Line 11: | ||
== Crafting the Cameras and Computers == | == Crafting the Cameras and Computers == | ||
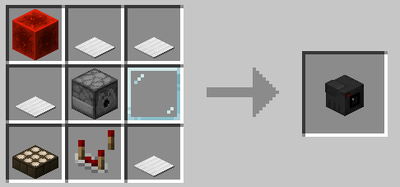
To begin, follow the recipe below to craft both a camera. | To begin, follow the recipe below to craft both a camera and computer. | ||
<div class="figure"> | <div class="figure"> | ||
[[File: | [[File:Security camera craft.png|400px]] | ||
</div> | </div> | ||
| Line 28: | Line 28: | ||
<div class="figure"> | <div class="figure"> | ||
[[File: | [[File:Security camera linking.png|400px]] | ||
</div> | </div> | ||
| Line 38: | Line 38: | ||
<div class="figure"> | <div class="figure"> | ||
[[File: | [[File:Security computer.png|400px]] | ||
</div> | </div> | ||
| Line 45: | Line 45: | ||
<div class="figure"> | <div class="figure"> | ||
[[File: | [[File:security_pc_options.png|400px]] | ||
</div> | </div> | ||
| Line 53: | Line 53: | ||
<span id="viewing-cameras"></span> | <span id="viewing-cameras"></span> | ||
== Viewing Cameras == | == Viewing Cameras == | ||
| Line 59: | Line 60: | ||
<div class="figure"> | <div class="figure"> | ||
[[File: | [[File:Security viewing cameras.png|400px]] | ||
</div> | </div> | ||
''Note: To remove items, use ‘Drop to remove’ by pressing Q or the Drop button while hovering over the item.'' | ''Note: To remove items, use ‘Drop to remove’ by pressing Q or the Drop button while hovering over the item.'' | ||
[[category:Features]] | [[category:Features]] | ||
Latest revision as of 03:53, 26 October 2025
Do you need to keep an eye on your valuables or watch out for unwelcome visitors? These simple steps will help you get started! NOTE: This plugin is currently NOT enabled hence recipes will not work
Crafting the Cameras and Computers
To begin, follow the recipe below to craft both a camera and computer.
Linking Cameras
- Create a group for your cameras with this command:
/cctv group create <name> - After creating the group, add cameras to it using:
/cctv group addcamera <groupName> <cameraName>
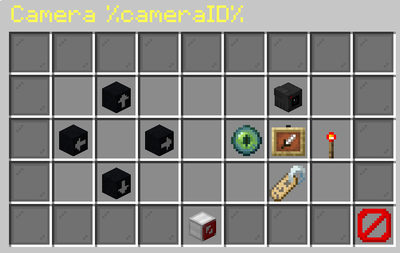
The <cameraName> is visible when you right-click the placed camera to open the Camera GUI.
Setting Up Computers
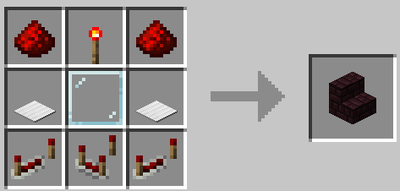
Computers are your tools for accessing the cameras. You can craft them by following the recipe provided.
Once you’ve placed a computer, right click it and you’ll see a menu with options:
- Ender Chest: “Computer Access” - Add or remove players (left-click) or toggle between private and public access (shift left-click).
- Chest: “Add camera group” - Select the camera group for the computer.
- Camera: “Add Cameras” - Add new cameras to the group selected for the computer.
Viewing Cameras
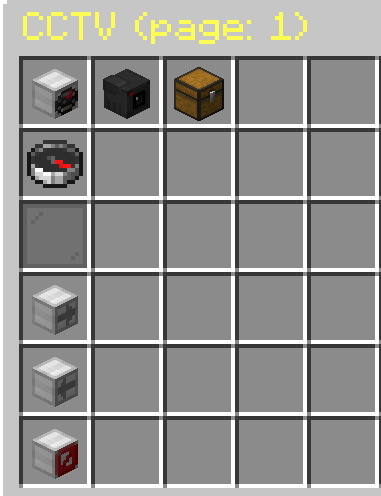
Now that you’ve set up your cameras, camera group, and computers, you can easily manage them from the main dashboard of the GUI, which will display all cameras belonging to the camera group.
Note: To remove items, use ‘Drop to remove’ by pressing Q or the Drop button while hovering over the item.

